


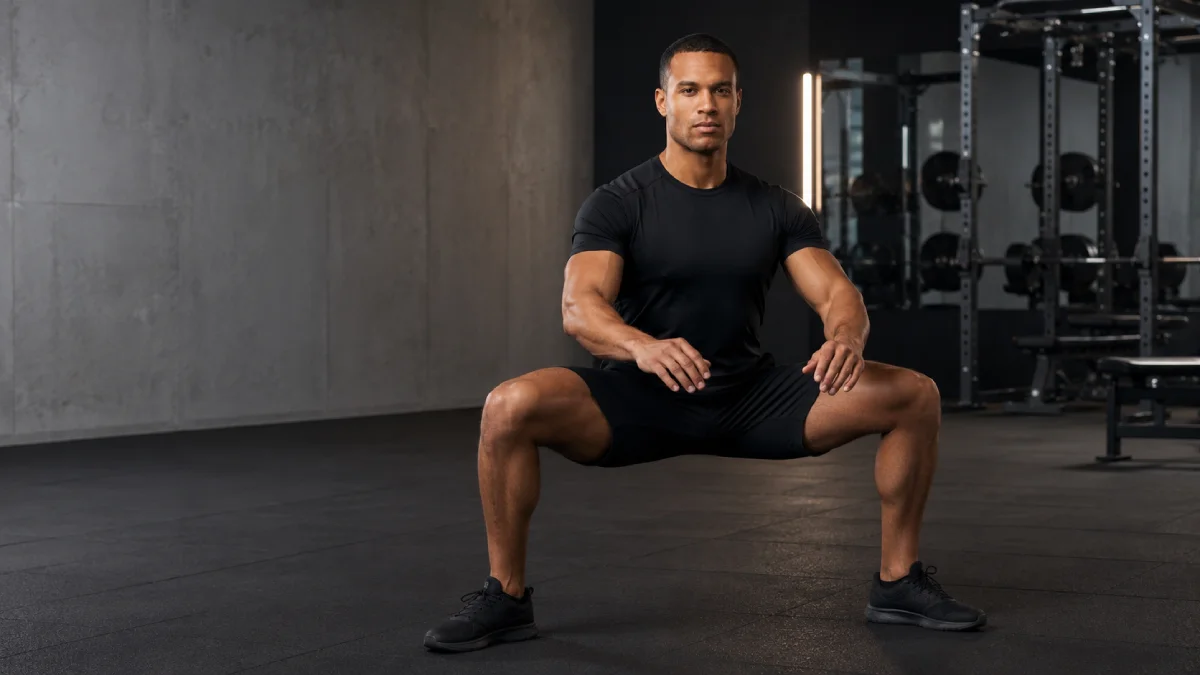
The plie squat is a wide-stance squat variation that trains your inner thighs, glutes, quads, hips, calves, and core control. It looks simple, but the real benefit comes from the details: how wide you stand, how far your toes turn out, how your knees track, how upright your torso stays, and how smoothly you control each rep.
It is also one of the most misunderstood squat variations. Many people use “plie squat” and “sumo squat” as the same exercise. They can look similar, but a true plie squat is usually more upright, more controlled, and more focused on hip rotation, inner-thigh strength, and lower-body alignment.
This guide explains how to do the plie squat properly, what muscles it works, how it differs from a sumo squat, which mistakes to avoid, and how to progress it with bodyweight, dumbbells, kettlebells, resistance bands, and elevated variations.
What Is a Plie Squat?
A plie squat is a lower-body exercise performed with your feet wider than shoulder-width and your toes turned outward. The word “plie” comes from ballet, where it describes bending the knees while maintaining posture and control.
In fitness training, the plie squat is used to strengthen the lower body while emphasizing the adductors, glutes, hips, and knee tracking. Unlike a standard squat, where your feet are usually closer and your toes point slightly outward, the plie squat uses a wider stance and more hip external rotation.
Quick Detail | Plie Squat |
|---|---|
Exercise type | Bodyweight or weighted lower-body exercise |
Main muscles | Adductors, glutes, quadriceps |
Secondary muscles | Hamstrings, calves, core |
Equipment needed | None, dumbbell, kettlebell, loop band, or stable platform |
Difficulty level | Beginner to intermediate |
Best for | Inner thighs, glute control, hip stability, home workouts |
The plie squat is best understood as a controlled wide-stance squat. It is not a shortcut for spot reducing thigh fat. It can, however, help build stronger lower-body muscles when combined with consistent strength training, nutrition, sleep, and recovery.
Plie Squat vs Sumo Squat: What’s the Difference?
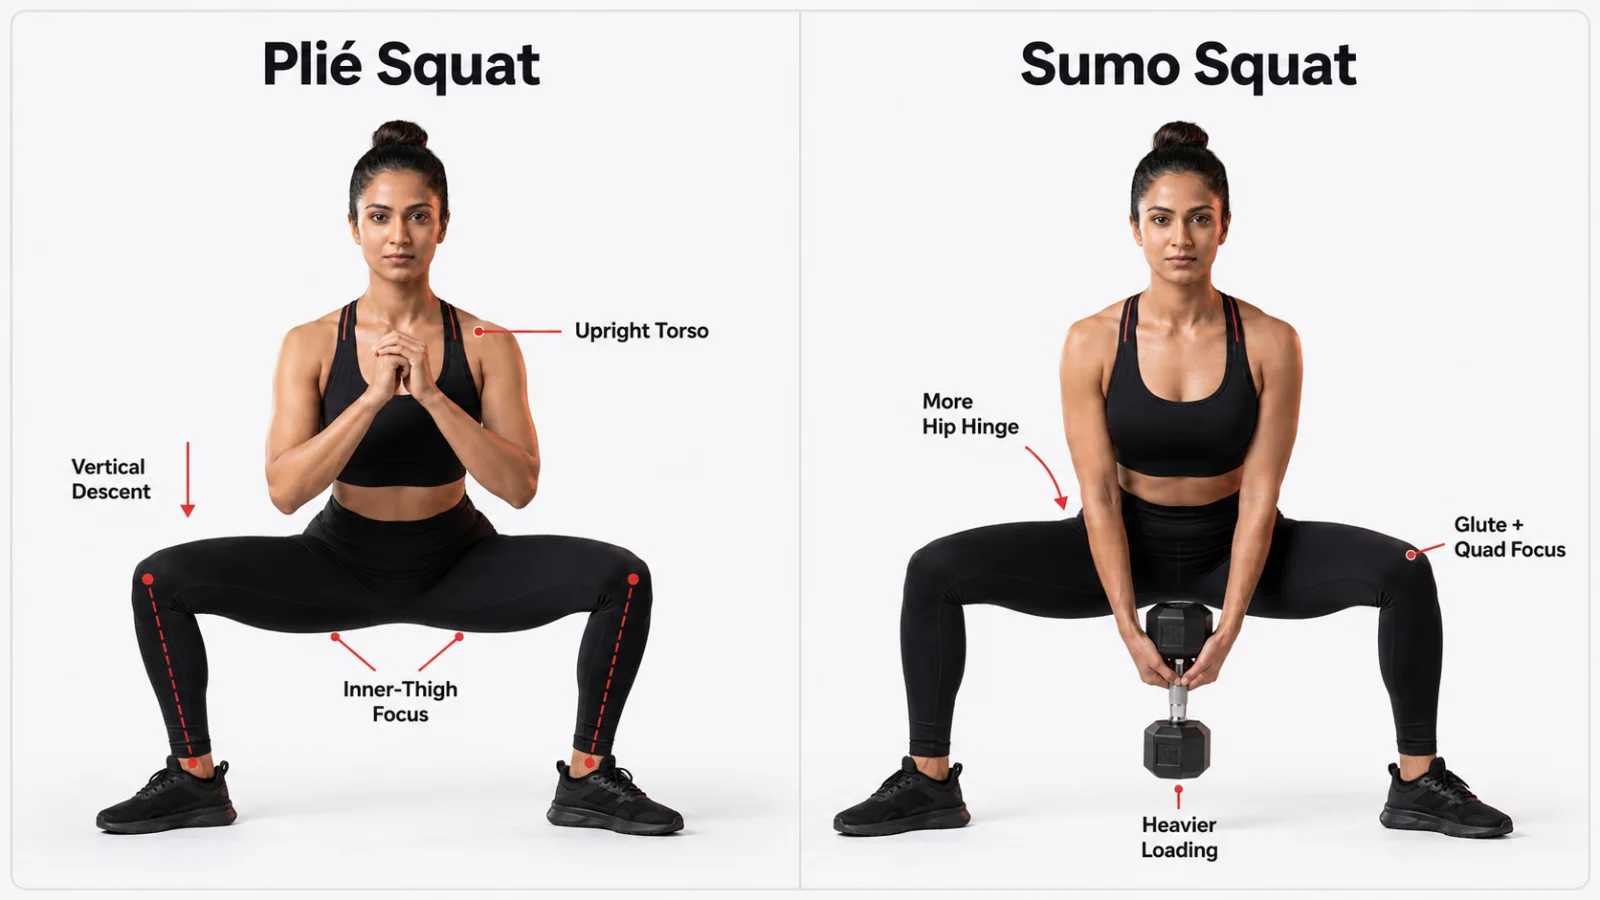
Plie squats and sumo squats both use a wide stance with toes turned outward, so it is easy to confuse them. The difference comes from how the movement is performed.
A plie squat is usually more vertical. You keep your chest tall, lower your hips straight down, and focus on controlled knee tracking. A sumo squat often allows more hip hinge, which means the hips move slightly backward and the torso leans forward more. Because of that, sumo squats are often easier to load heavier.
Factor | Plie Squat | Sumo Squat |
|---|---|---|
Torso position | More upright | Slightly more forward lean |
Hip action | More vertical descent | More hip hinge |
Pelvis position | More stacked and controlled | More backward hip shift |
Training feel | Inner thighs, glutes, hip control | Glutes, adductors, quads, strength |
Loading style | Bodyweight to moderate load | Often loaded heavier |
Best for | Control, mobility, inner-thigh focus | Strength and progressive overload |
The names are sometimes used interchangeably online, so the execution matters more than the label. If your chest stays tall and your knees track outward with your toes, it will feel more like a plie squat. If you hinge more at the hips and load the movement heavier, it will feel closer to a sumo squat.
For complete lower-body development, pair plie squats with the dumbbell goblet squat, barbell back squat, and front squat. These exercises train different squat patterns and help you build strength beyond one stance.
Plie Squat Muscles Worked
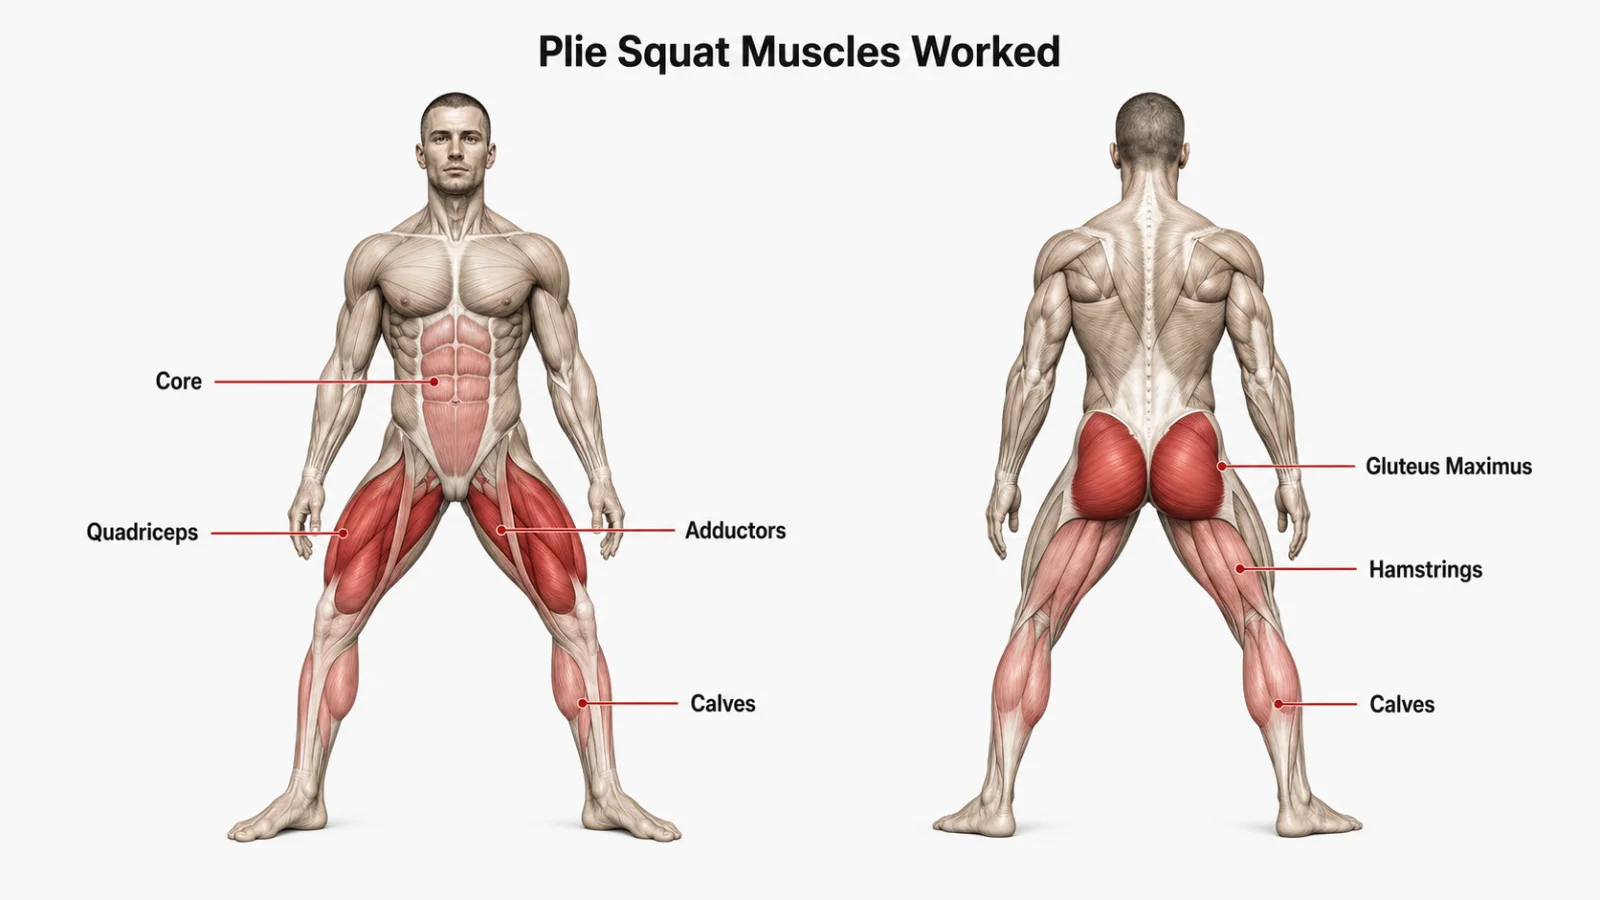
The plie squat mainly trains the adductors, glutes, and quadriceps. It also uses the hamstrings, calves, and core to stabilize the movement.
Muscle Group | Role in the Plie Squat |
|---|---|
Adductors / inner thighs | Control the wide stance and help bring the legs back toward the midline |
Gluteus maximus | Extends the hips as you stand up |
Quadriceps | Straighten the knees during the upward phase |
Hamstrings | Assist with hip control and lower-body stability |
Calves | Stabilize the ankles and feet |
Core | Keeps the torso upright and pelvis controlled |
Adductors / Inner Thighs
The adductors are the muscles on the inner side of your thighs. In a plie squat, they help control the wide stance and assist as you stand back up. This is why the exercise is often used in inner-thigh workouts.
This is also where many fitness articles get the exercise wrong. A plie squat is not mainly an “outer thigh” exercise. The wide stance and outward toe angle place more demand on the inner-thigh region, especially the adductors.
In their 1999 study, McCaw and Melrose examined stance width and bar load during parallel squats. Their research on stance width and muscle activity during the parallel squat found that stance width did not isolate different parts of the quadriceps, but it did influence muscle activity around the medial thigh and glute region.
That matters because it supports a practical coaching point: changing stance width does not magically isolate one muscle, but it can shift how your lower body shares the work.
Gluteus Maximus
The gluteus maximus helps extend your hips as you rise from the bottom of the squat. You will usually feel the glutes more when you control the lowering phase, avoid rushing your reps, and stand tall at the top without leaning backward.
In a 2009 EMG study, Paoli, Marcolin, and Petrone tested squat stance widths and found higher gluteus maximus activity when squats were performed with a maximum stance width. Their research on stance width and EMG activity in back squats supports the idea that wide-stance squat variations can be useful for glute-focused lower-body training.
Still, the plie squat should not be described as a pure glute isolation exercise. It is better understood as a lower-body compound movement that shares work between the adductors, glutes, quads, and stabilizers.
Quadriceps
The quadriceps are the muscles on the front of your thighs. They help straighten your knees as you stand up.
You will usually feel the quads more when you move slowly, control the depth, and keep your knees tracking in line with your toes. If your stance becomes extremely wide, the movement may shift more toward the hips and inner thighs.
For more quad-focused training, combine plie squats with the leg press, machine hack squat, or front squat.
Hamstrings, Calves, and Core
The hamstrings assist with hip control, especially during the lowering phase. The calves help stabilize the ankles and feet, especially when you add a calf raise. The core keeps your torso upright and helps prevent the pelvis from tipping too far forward or backward.
In 2021, Coratella et al. reviewed how stance width and bar placement affect squat mechanics and muscle activity. Their study on stance width, squat mechanics, and myoelectric activity reinforces a useful training point: small changes in foot angle, stance width, torso position, and loading style can change how a squat feels and where the work is distributed.
Research Note: What the Evidence Does and Does Not Prove
Most available research is on squat stance width, not the plie squat specifically. That means the evidence should be applied carefully.
The studies suggest that stance width can change hip, glute, adductor, and knee demands. But no single squat variation perfectly isolates one muscle. A plie squat is best used as a controlled wide-stance lower-body exercise, not as a promise of isolated inner-thigh activation.
Why Foot Turnout and Hip Rotation Matter
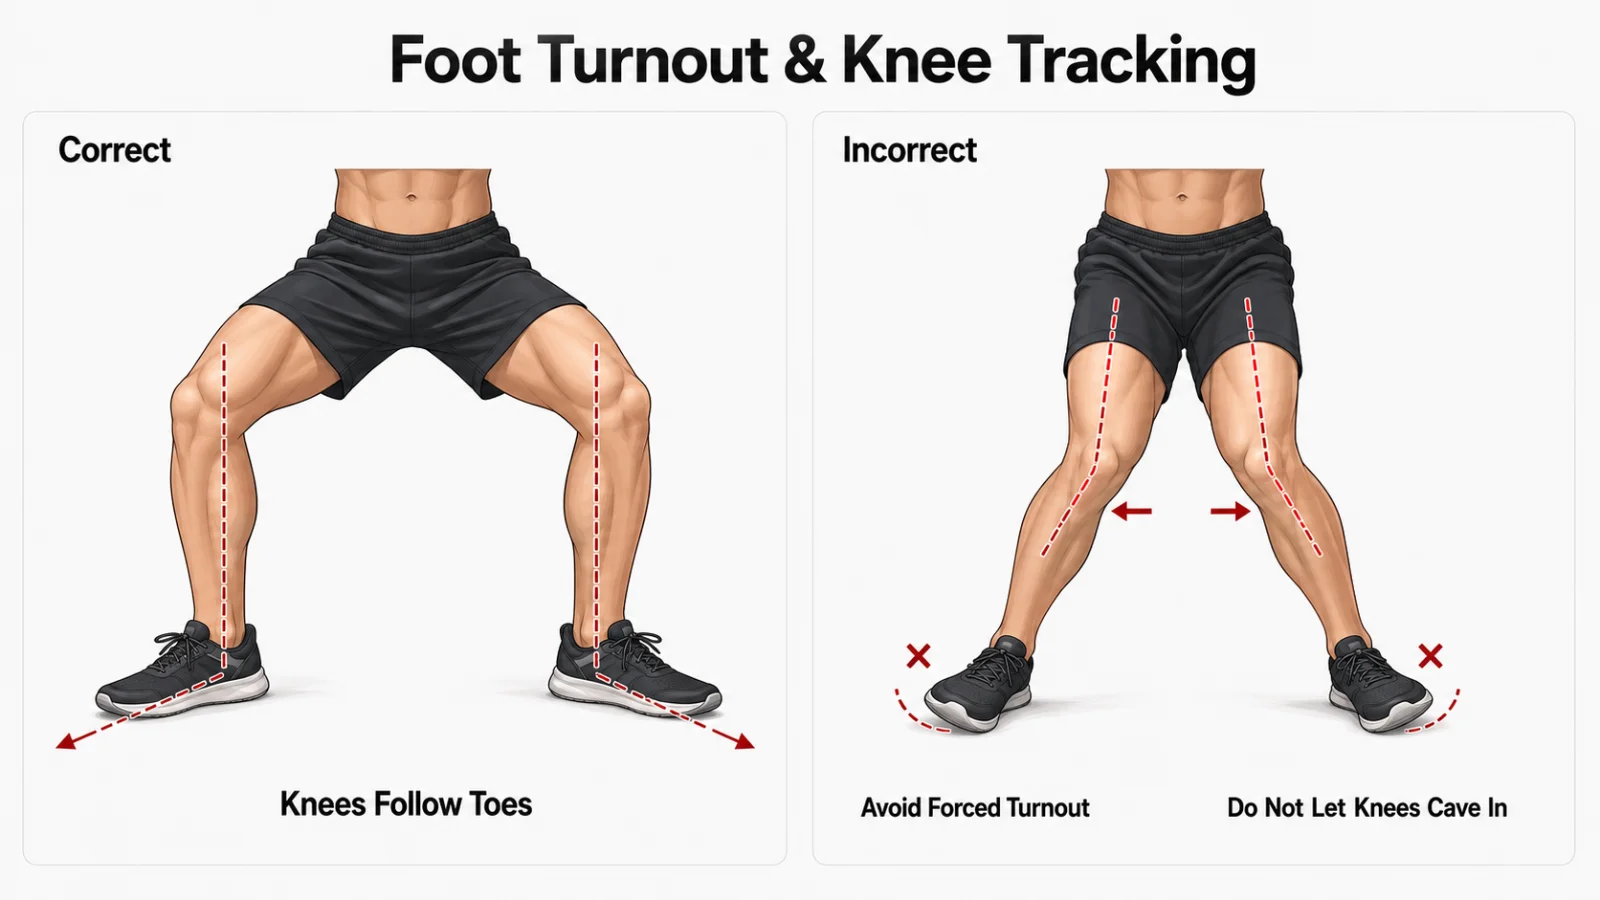
Your foot angle in a plie squat should come from your hips, not from twisting your knees or ankles.
Many people turn the toes out too far because they think a bigger turnout means a better plie squat. That is not always true. If your hips cannot comfortably rotate outward, forcing the feet into a wide angle can make the knees collapse, twist, or feel irritated.
A practical starting point is 30–45 degrees of toe turnout. Some people may need less. A small number of people with excellent hip mobility may tolerate more. The goal is not to copy a ballet turnout. The goal is to find a stance where your knees can follow your toes without pain.
In 2024, Chiu studied how greater squat stance width affects hip demands. The study on greater squat stance width and three-dimensional hip moment demands suggests that wider squats can increase rotational and extension demands around the hip. In simple terms, the wider your stance, the more your hips need to control the position.
This is why the plie squat is not only a thigh exercise. It is also a hip-control exercise. Your deep lateral rotators, glutes, adductors, and core all help keep the pelvis steady while the knees travel outward.
Quick Hip Mobility Check Before Plie Squats
Before loading the exercise, test whether your hips can support the stance.
Stand with your feet slightly wider than shoulder-width and turn your toes outward comfortably. Bend your knees slightly and watch what happens. If your knees naturally follow your toes, the stance is likely workable. If your knees cave inward, your arches collapse, or your hips pinch, reduce the stance width and toe angle.
You can also try a bodyweight hold. Lower halfway into a plie squat and pause for three seconds. You should feel muscular tension in the inner thighs and glutes, not sharp pressure in the knees or hips.
If the position feels unstable, practice with a smaller stance first. Over time, hip mobility and control can improve, but it should not be forced through pain.
Lateral Rotator and Adductor Warm-Up Tips
A short warm-up can make plie squats feel smoother. Start with bodyweight squats, hip circles, side lunges, and gentle adductor rocks. These drills prepare the hips for outward rotation and side-to-side control.
For tight hips, use a smaller toe angle at first. Forcing a deep turnout without control can shift stress into the knees. The plie squat should feel strong, not twisted.
A good rule: your foot angle is correct when your knees, toes, and hips agree with each other. If one joint is fighting the position, adjust the stance.
Benefits of Plie Squats
The plie squat is useful because it trains strength, control, balance, and mobility without needing heavy equipment.
1. Strengthens the Inner Thighs
The wide stance places more demand on the adductors. This makes the plie squat useful for people who want to train the inner thighs with better control.
It is not a magic “thigh slimming” exercise, but it can help develop stronger inner-thigh muscles as part of a complete lower-body program.
2. Builds Glute and Hip Control
Your glutes help extend the hips as you stand. At the same time, your hips need to stay stable as your knees track outward.
This makes the plie squat helpful for improving lower-body coordination, especially if you struggle to keep your knees aligned during squats, lunges, or step-ups.
3. Improves Knee Tracking Awareness
A good plie squat teaches you to keep your knees moving in the same direction as your toes. This matters because knee collapse, also called knee valgus, is one of the most common form errors in lower-body training.
The cue is simple: your knees do not need to be forced outward aggressively, but they should not cave inward.
4. Works Well for Home Workouts
You do not need a squat rack or machine to start. A bodyweight plie squat is enough to learn the movement.
Once your form improves, you can add resistance using dumbbells, a kettlebell, or a loop resistance band. These tools make the plie squat easy to progress without needing a full gym setup.
5. Easy to Progress
You can make the plie squat harder without changing the basic pattern. Add a dumbbell, use a kettlebell, slow down the tempo, hold the bottom position, add pulses, or perform calf raises.
This makes it useful for beginners, home workouts, barre-style routines, and strength-focused lower-body training.
6. Supports Better Lower-Body Balance
Because the stance is wide and the toes are turned out, your ankles, knees, hips, and core have to work together. This makes the plie squat useful beyond just muscle building.
It teaches control. And control is what makes lower-body exercises safer and more effective.
How to Do a Plie Squat Properly
Follow these steps to perform a clean bodyweight plie squat.
1. Set Your Stance
Stand with your feet wider than shoulder-width. Turn your toes outward at a comfortable angle.
Do not force an extreme turnout. A good starting range is around 30–45 degrees, but your ideal angle depends on your hip mobility.
2. Stand Tall
Keep your chest lifted, shoulders relaxed, and spine neutral. Think of stacking your ribs over your pelvis.
Avoid over-arching your lower back. Also avoid tucking your pelvis so hard that your lower back rounds. Aim for a natural, strong posture.
3. Brace Your Core
Lightly brace your core before you move. This helps keep your torso upright and your pelvis controlled.
You do not need to hold your breath aggressively. Just create enough tension to stay stable.
4. Lower Straight Down
Bend your knees and lower your hips straight down. Your knees should move in the same direction as your toes.
Avoid shifting your weight too far forward. Keep your pressure through the mid-foot and heels.
5. Control the Bottom Position
Lower only as far as you can while keeping your heels grounded, knees stable, and torso tall.
You do not need to force maximum depth. A clean partial range is better than a deep rep with poor control.
6. Stand Back Up
Press through your mid-foot and heels to stand tall. Keep your knees tracking outward as you rise.
At the top, squeeze your glutes lightly without leaning back.
Simple Form Cues for Better Plie Squats
Use these cues while practicing:
Chest tall.
Knees follow toes.
Lower straight down.
Weight through mid-foot and heels.
Push the floor apart.
Stop before your form breaks.
A plie squat should feel controlled. Muscle burn is normal. Sharp knee pain, hip pinching, or lower-back pressure is not something to push through.
Common Plie Squat Mistakes and How to Fix Them
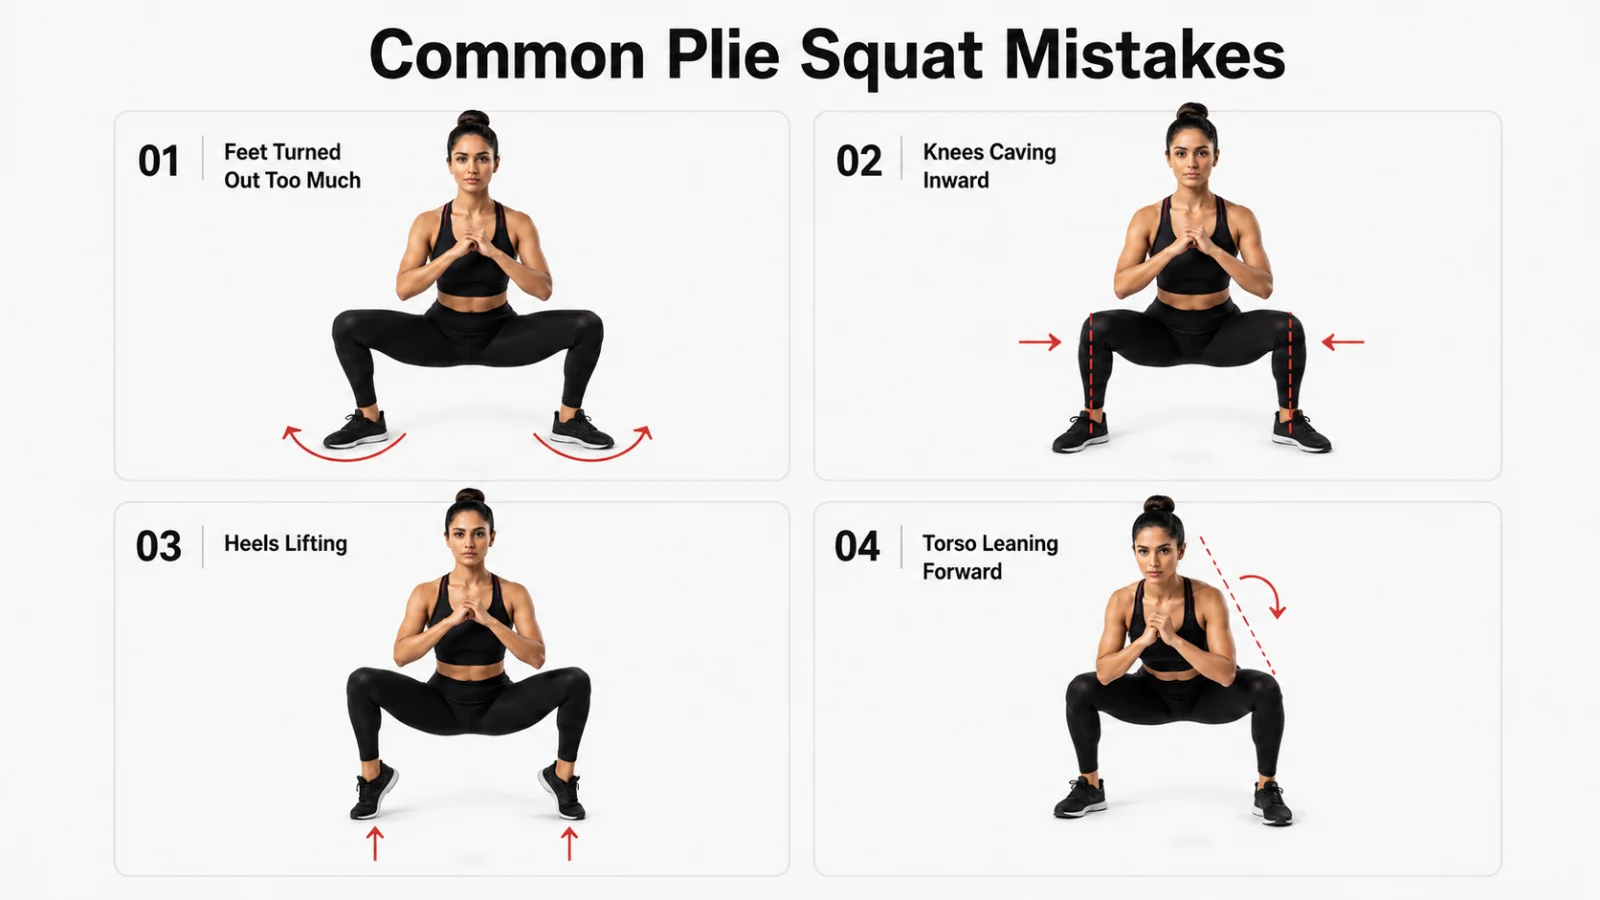
1. Turning the Feet Out Too Much
Many people try to copy a ballet-style turnout even if their hips cannot support it. This can put unwanted stress on the knees and ankles.
Fix: Use a comfortable toe angle. Your knees should be able to track in the same direction as your toes without twisting.
2. Letting the Knees Collapse Inward
If your knees cave inward, the exercise becomes less stable and may irritate the knees.
Fix: Push your knees gently toward your toes. Do not force them aggressively outward. Think controlled alignment, not exaggeration.
3. Lifting the Heels
Heel lift can happen when you go too deep, shift forward, or lack ankle control.
Fix: Reduce your depth and keep your weight through the mid-foot and heel. Use a stable surface and avoid slippery flooring.
4. Leaning Too Far Forward
A plie squat should stay more upright than a heavy hip-hinge squat. If your torso falls forward, the movement may shift away from the intended target.
Fix: Shorten your stance slightly, brace your core, and lower straight down instead of pushing your hips too far back.
5. Forcing Too Much Depth
Depth is useful only if you can control it. Going too low with poor alignment reduces the quality of the movement.
Fix: Stop at the deepest point where your heels stay down, knees track cleanly, and torso remains stable.
6. Thinking the Knees Can Never Move Forward
The real issue is not simply whether your knees move forward. The bigger concern is whether your knees track well, your heels stay grounded, and the movement feels pain-free.
Some forward knee travel can be normal, especially if your body proportions require it to keep the torso upright. Forcing the knees to stay far behind the toes can sometimes shift too much stress into the hips or lower back.
In 2025, Larsen et al. studied stance width during maximum back squats. Their research on stance width, kinematics, and kinetics during maximum back squats reported that wider stances can involve smaller knee flexion angles, lower knee extension joint moments, and reduced quadriceps forces compared with narrower squats.
This does not mean plie squats are automatically safe for every knee, and it does not mean they are the “best” exercise for everyone with knee pain. But it does show why stance width can change how load is shared across the lower body.
Fix: Let your knees move naturally in line with your toes. Avoid collapsing inward, twisting, or forcing a painful range.
Best Plie Squat Variations
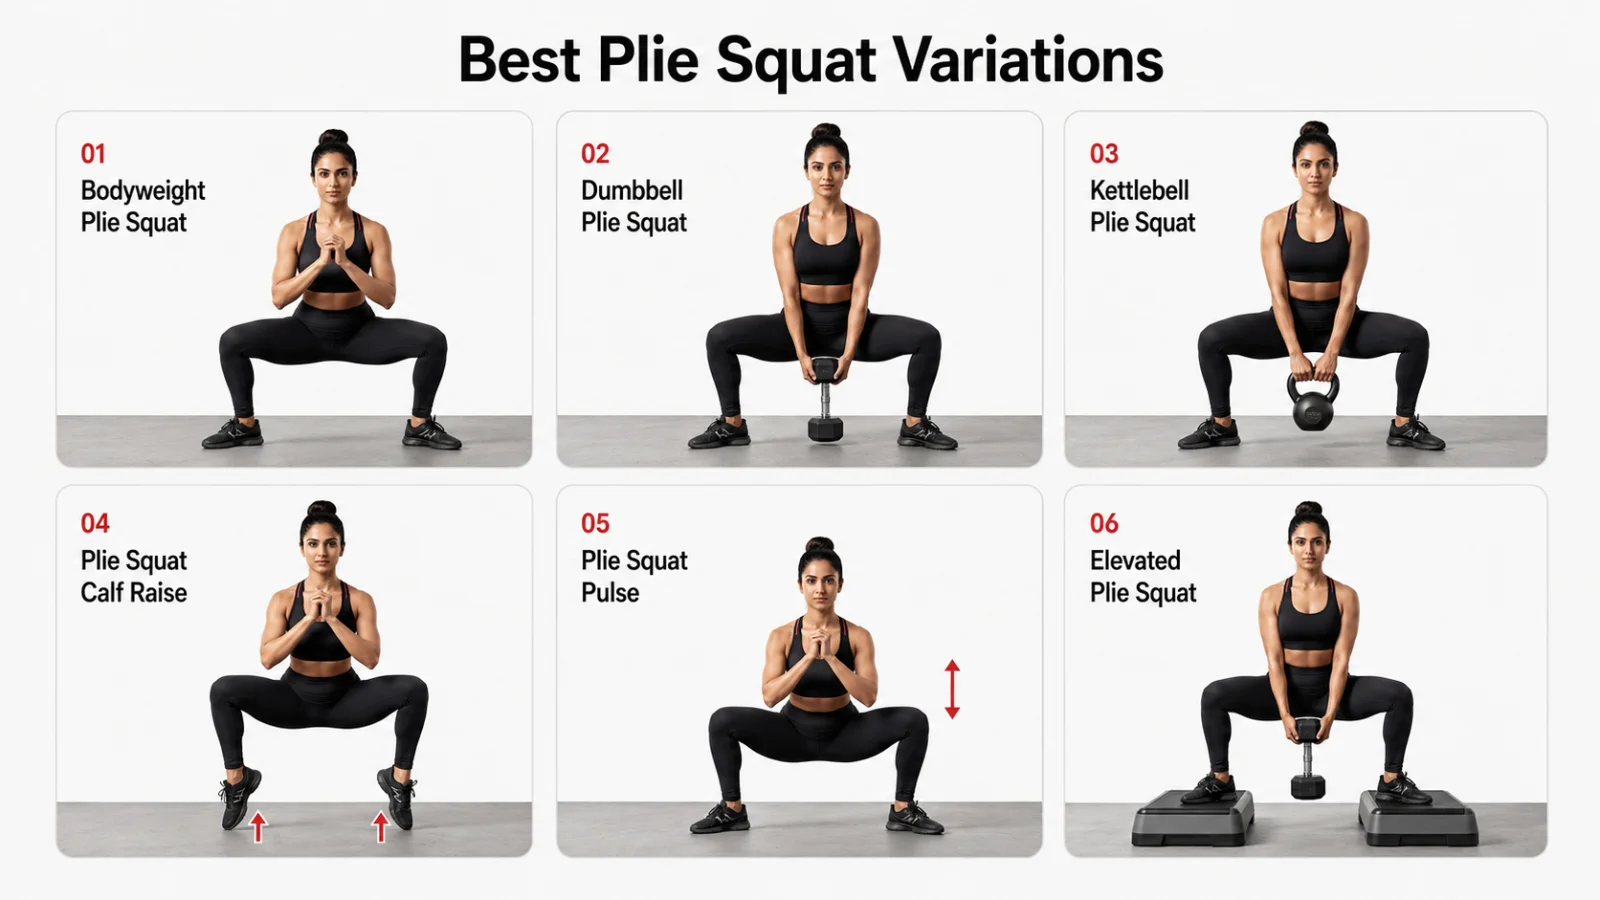
Once you can perform the bodyweight version with good control, try these variations.
1. Bodyweight Plie Squat
This is the best starting point. Use it to learn stance, knee tracking, breathing, and depth.
Best for: Beginners, warm-ups, form practice
Equipment: None
Start with 2–3 sets of 8–10 reps. Move slowly and pause for one second at the bottom. If you cannot hold your balance, narrow your stance slightly.
2. Dumbbell Plie Squat
A dumbbell plie squat is one of the easiest ways to progress the exercise. Hold one dumbbell vertically with both hands in front of your body. Keep it close to your center line as you squat.
This variation works well for home workouts because you only need one dumbbell and a stable floor surface. Choose a weight that lets you keep your chest tall and knees controlled.
Best for: Strength, glutes, inner thighs
Equipment: Dumbbell
If you want a fixed-weight option, LIFE FIT also has hex dumbbells that work well for lower-body and full-body strength training.
3. Kettlebell Plie Squat
A kettlebell plie squat feels natural because the load hangs between your legs. Hold the kettlebell by the handle or horns and let it stay close to your center of gravity.
This variation is a strong option for compact home gyms, small studios, and lower-body conditioning sessions.
Best for: Home workouts and loaded lower-body training
Equipment: Kettlebell
4. Plie Squat Pulse
Lower into the squat and perform small controlled pulses near the bottom. Keep the movement smooth and avoid bouncing.
This variation creates more time under tension. It is useful for endurance and control, but it should not replace full-range strength work.
Best for: Muscle endurance and control
Equipment: Bodyweight or light dumbbell
5. Plie Squat Calf Raise
A plie squat calf raise adds ankle and calf involvement. Perform a plie squat, stand tall, then lift your heels under control. You can also hold a partial squat and raise the heels from there, but this is more advanced.
Start with bodyweight before adding load. This version challenges balance, so use a stable surface.
Best for: Calves, balance, ankle control
Equipment: Bodyweight
6. Resistance Band Plie Squat
Place a loop band above your knees. The band gives feedback and encourages you to keep the knees tracking outward.
This variation is useful if you tend to let the knees collapse inward. Keep the band tension light enough that it improves your control instead of pulling your form apart.
Best for: Knee tracking and glute activation
Equipment: Loop resistance band
7. Elevated Plie Squat
Stand on two stable platforms or steps with a dumbbell hanging between your legs. This allows a deeper range of motion.
Use this only after your basic plie squat feels strong and stable. The extra depth can be useful, but it also requires more control.
Best for: Advanced range of motion
Equipment: Platforms plus dumbbell
For safer weighted variations, train on a stable surface. A proper gym floor mat can improve grip and comfort during lower-body exercises.
How Many Plie Squats Should You Do?
Your sets and reps should match your goal.
Goal | Sets | Reps |
|---|---|---|
Learn the movement | 2–3 | 8–10 |
Muscle endurance | 3 | 15–20 |
Strength with dumbbell | 3–4 | 8–12 |
Warm-up or activation | 1–2 | 10–12 |
Barre-style burnout | 2–3 | 20–30 seconds of pulses |
Beginners should start with bodyweight. Add load only when the movement feels stable, smooth, and pain-free.
If you are using the plie squat as a main lower-body exercise, train it 1–2 times per week. If you are using it as an accessory exercise, add it after heavier movements like squats, leg press, or lunges.
Plie Squat Workout Example
Here is a simple lower-body workout using the plie squat.
Exercise | Sets | Reps |
|---|---|---|
Bodyweight Plie Squat | 3 | 12 |
Dumbbell Goblet Squat | 3 | 10 |
Dumbbell Lunge | 3 | 10 each side |
Dumbbell Step-Up | 3 | 10 each side |
Standing Calf Raise | 3 | 15 |
You can pair plie squats with the dumbbell lunge, dumbbell step-up, or dumbbell rear lunge for a complete lower-body routine.
For a more strength-focused setup, combine plie squats with a squat rack, free weights, and bench-based exercises. LIFE FIT’s home gym equipment collection can help you build a compact setup based on your space, budget, and training goals.
Who Should Be Careful With Plie Squats?
Plie squats are beginner-friendly, but they are not perfect for every body or every situation.
Be careful if you have:
Knee pain during wide-stance movements
Hip pinching or hip impingement symptoms
Recent knee, hip, ankle, or lower-back injury
Poor balance
Pain when turning your toes outward
Pregnancy or postpartum concerns without professional guidance
If the movement causes sharp pain, stop. Reduce your stance width, reduce your depth, or choose a more comfortable squat variation.
A mild muscle burn in the inner thighs or glutes is normal. Joint pain is not something to ignore.
Equipment That Can Help You Progress
You do not need equipment to start plie squats. A bodyweight version is enough to learn stance, knee tracking, balance, and depth.
Once your form is stable, adding resistance can make the exercise more useful for strength and muscle development. A single dumbbell held vertically is the easiest progression for most home workouts. A kettlebell also works well because it hangs naturally between the legs during the movement.
For safer home training, use a stable surface and avoid slippery flooring. A gym floor mat can improve grip and comfort during lower-body exercises.
If you are building a broader setup, LIFE FIT’s home gym equipment collection can help you add dumbbells, racks, benches, flooring, and strength equipment based on your space and goals.
Frequently Asked Questions
They are similar, but not always the same. Both use a wide stance and outward toe angle. A plie squat is usually more upright and controlled, while a sumo squat often uses more hip hinge and can be loaded heavier.
Plie squats mainly work the adductors, glutes, and quadriceps. They also involve the hamstrings, calves, and core for stability.
Yes. Because of the wide stance and outward knee tracking, plie squats can train the adductors, which are the muscles of the inner thigh.
They can help train the glutes, especially when performed with good depth, controlled tempo, and added resistance. For stronger glute development, combine them with hip thrusts, goblet squats, lunges, and step-ups.
Plie squats are not automatically bad for knees. Problems usually happen when the stance is too wide, toes are forced outward, knees collapse inward, or depth is pushed beyond control. Keep your knees tracking in line with your toes and stop if you feel sharp pain.
Start slightly wider than shoulder-width. Adjust from there based on comfort and control. Your stance should allow your knees to follow your toes without pain or twisting.
Beginners should start with bodyweight. Once the movement feels controlled, a light dumbbell or kettlebell can be added.
Plie squats can strengthen the thighs and improve muscle tone, but they do not directly spot reduce fat from the thighs. Fat loss depends on overall training, nutrition, sleep, and consistency.
For beginners, the bodyweight plie squat is best. For strength, the dumbbell plie squat is one of the easiest and most effective progressions. For endurance, plie squat pulses work well.
Final Takeaway
The plie squat is a simple but effective lower-body exercise when done with the right technique. It trains the inner thighs, glutes, quads, hips, calves, and core while improving control in a wide stance.
The key is not to force an extreme turnout or chase maximum depth. Keep your chest tall, knees tracking with your toes, heels grounded, and movement smooth. Start with bodyweight, then progress with a dumbbell, kettlebell, band, or pulse variation when your form is ready.
For a stronger lower-body routine, combine plie squats with goblet squats, lunges, step-ups, front squats, and leg press variations. Over time, this gives you a better mix of strength, stability, mobility, and muscle development.
Sources & References
McCaw & Melrose, 1999 — Stance width and bar load effects on leg muscle activity during the parallel squat
https://pubmed.ncbi.nlm.nih.gov/10188748/Paoli, Marcolin & Petrone, 2009 — The effect of stance width on the electromyographical activity of eight superficial thigh muscles during back squat with different bar loads
https://pubmed.ncbi.nlm.nih.gov/19130646/Coratella et al., 2021 — Effects of stance width and barbell placement on kinematics, kinetics, and myoelectric activity in back squats
https://pmc.ncbi.nlm.nih.gov/articles/PMC8440835/Chiu, 2024 — Greater squat stance width alters three-dimensional hip moment demands
https://pubmed.ncbi.nlm.nih.gov/39486379/Larsen et al., 2025 — The Impact of Stance Width on Kinematics and Kinetics During Maximum Back Squats
https://pubmed.ncbi.nlm.nih.gov/39652724/
0 Comments
Loading comment form…
Loading comments…