
The front squat is a barbell squat variation in which the weight rests across the front of your shoulders rather than your upper back. This front-loaded position encourages a more upright torso and places substantial demand on your quadriceps, core and upper back.
It is commonly used to develop lower-body strength, improve front-rack control and build the postural strength needed for movements such as the clean. However, the exercise can feel awkward when you first learn it. Limited ankle mobility, a weak upper back or an unstable rack position can quickly disrupt your technique.
The goal is not to keep your torso perfectly vertical or force your elbows as high as possible. The goal is to maintain a stable position that keeps the bar balanced over the middle of your feet throughout the repetition.
This guide explains how to perform the front squat correctly, which muscles it works, how it compares with the back squat and how to fix the technical or mobility restrictions that may be holding you back.
Front Squat at a Glance
Category | Details |
|---|---|
Exercise type | Compound strength exercise |
Difficulty | Intermediate |
Primary muscles | Quadriceps and gluteus maximus |
Secondary muscles | Adductors, hamstrings, calves, abdominals and spinal erectors |
Key stabilizers | Upper back, trapezius, obliques and deep core muscles |
Equipment | Barbell, weight plates and squat rack |
Movement pattern | Squat |
Main training goals | Strength, muscle development, Olympic lifting support and athletic performance |
What Is a Front Squat?
A front squat is performed with a barbell positioned across the front of the shoulders, close to the base of the neck. The lifter supports the bar in a front-rack position while bending at the knees and hips to lower into a squat.
Moving the bar from behind the body to the front changes how the load must be balanced. To keep the bar over the mid-foot, most lifters use a more upright torso than they would during a low-bar back squat.
This position makes the front squat particularly useful for developing:
Quadriceps strength
Trunk stability
Upper-back endurance
Front-rack control
Clean-receiving strength
Upright squat mechanics
The front squat is still a complete lower-body exercise. Although it creates significant knee-extension demand, it should not be treated as a quadriceps isolation movement or as an automatic replacement for every other squat variation.
Essential Front Squat Equipment and Setup
For a conventional barbell front squat, you will need:
An Olympic or standard barbell
Suitable weight plates
A stable squat rack or power rack
Safety arms or spotter pins
Flat, stable training shoes or weightlifting shoes
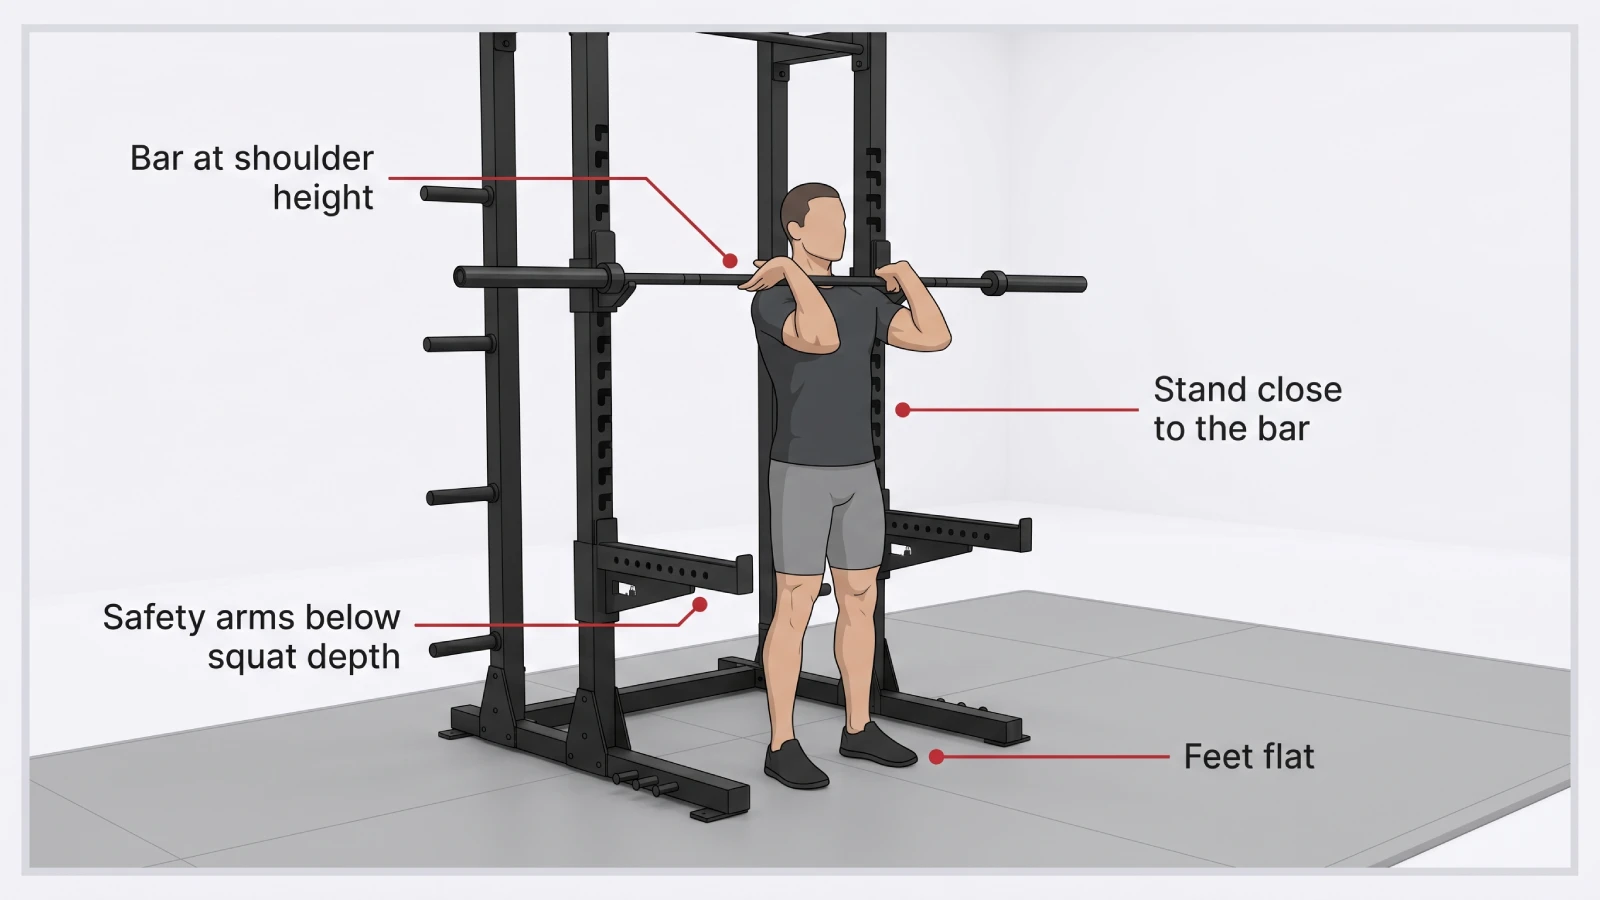
A rack allows you to begin with the bar at shoulder height instead of lifting it from the floor. This makes the exercise easier to set up and lets you focus on the squat rather than the clean.
You can explore LIFE FIT’s barbell collection, weight plates and squat racks when planning a free-weight training area.
Set the rack height correctly
Position the J-hooks around mid-chest to shoulder height.
The bar should be low enough that you can get fully underneath it with your feet flat. You should need only a small amount of knee and hip extension to clear the hooks.
If the bar is set too high, you may need to stand on your toes to un-rack it. If it is too low, you will waste energy performing a partial squat before the working set has even started.
Position the safety arms
Set the safety arms slightly below the lowest bar position you expect to reach.
They should be high enough to catch the bar if you fail a repetition, but not so high that the bar touches them during a correctly performed squat.
Practice lowering an empty bar onto the safeties before attempting challenging loads.
How to Do the Front Squat Correctly
Begin with an empty bar or a light load. The front squat exposes technical weaknesses quickly, so adding weight before establishing a secure front rack usually makes the movement harder to learn.
1. Approach the bar
Face the bar and step close to it.
Position your feet approximately hip-width apart under the bar. Bend your knees slightly and bring the front of your shoulders underneath it.
The bar should contact the muscular shelf formed by your front deltoids.
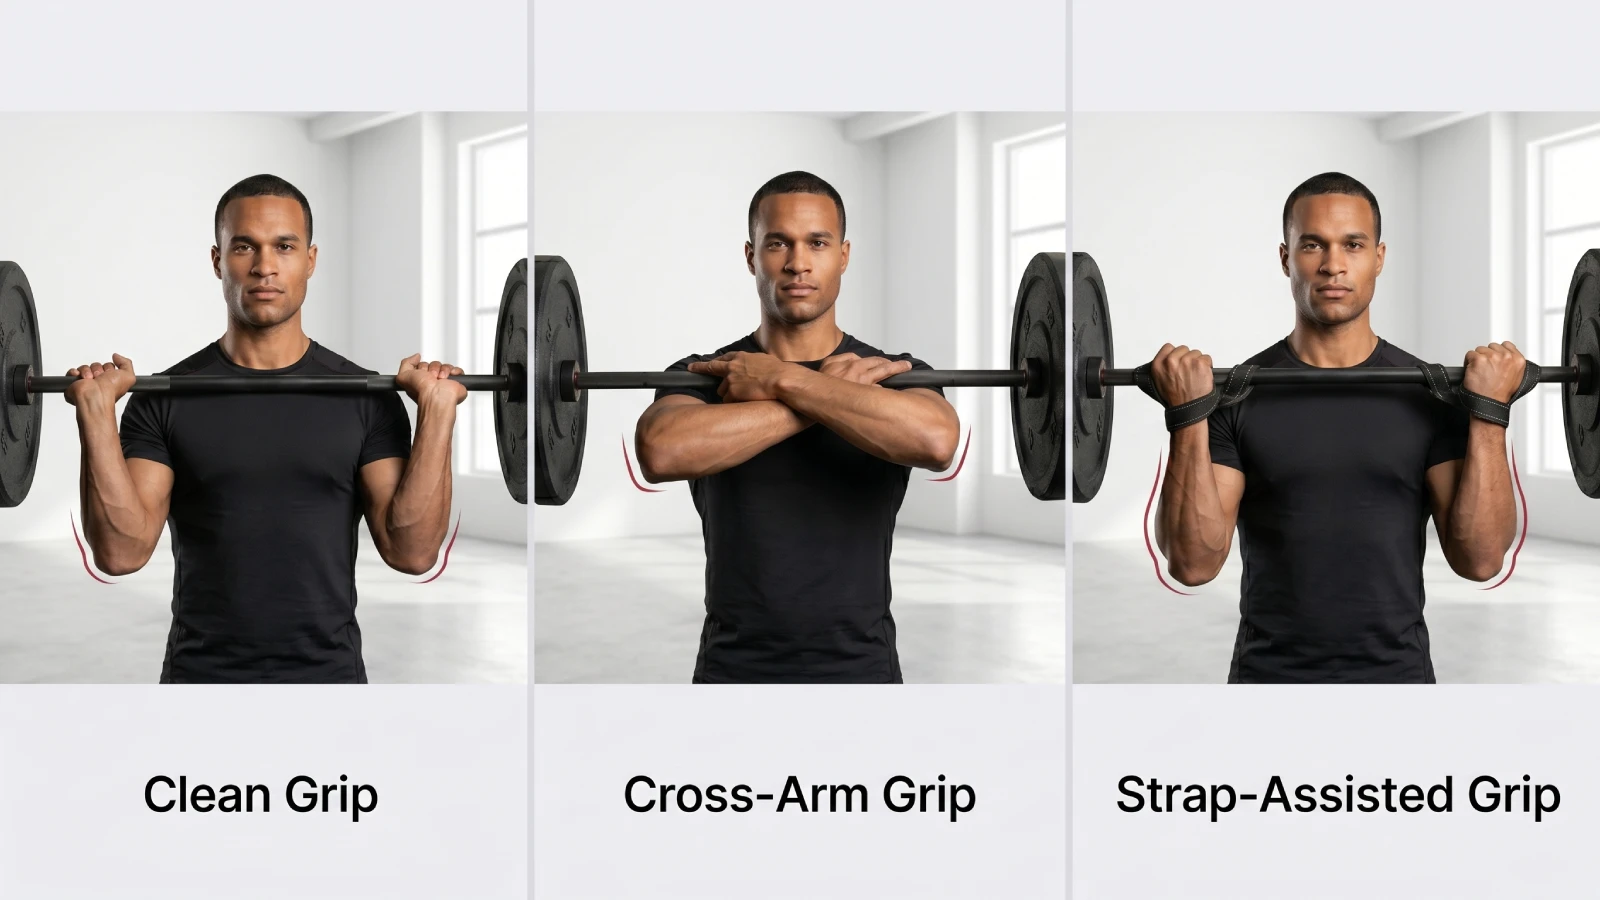
2. Mastering the Front-Rack Position: Grip Options
The bar should rest across the shoulders rather than being held entirely in the hands.
Your hands are there to guide the bar, not to lift it.
Choose the grip that allows you to maintain the most secure rack position.
Clean grip
Place your fingertips under the bar just outside shoulder width.
Drive your elbows forward and upward until your upper arms are approximately parallel with the floor, or as close to that position as your mobility allows without pain.
You do not need to keep your entire hand wrapped around the bar. Two or three fingertips under the bar may be enough when the shoulders are supporting the load correctly.
The clean grip provides the strongest transfer to Olympic weightlifting.
Cross-arm grip
Cross your arms in front of your body and place each hand over the bar near the opposite shoulder.
Keep both elbows lifted and level.
This position reduces the wrist-extension requirement, making it useful for lifters who cannot yet access a comfortable clean grip. However, it may feel less secure and provides less direct transfer to the clean.
Strap-assisted grip
Loop two lifting straps around the bar at approximately shoulder width.
Hold the loose ends of the straps while keeping your elbows forward. This provides a secure front-rack option without requiring significant wrist extension.
It can be useful during mobility development, but it should be practiced with light weights first.
3. Brace and un-rack the bar
Take a breath into your abdomen, sides and lower back. Tighten your torso before lifting the bar from the rack.
Stand straight up to clear the hooks. Take one controlled step backwards with each foot, followed by a small adjustment if necessary.
Avoid taking several unnecessary steps. The farther you walk from the rack, the more energy you waste and the harder it becomes to rerack the bar safely.
4. Establish your stance
Place your feet around shoulder-width apart.
Turn your toes slightly outward if that position allows your knees to track comfortably. The correct stance depends on your hip structure, limb lengths and mobility, so it does not need to look identical for every lifter.
Maintain three points of contact with the floor:
The heel
The base of the big toe
The base of the little toe
This is sometimes called the tripod foot position.
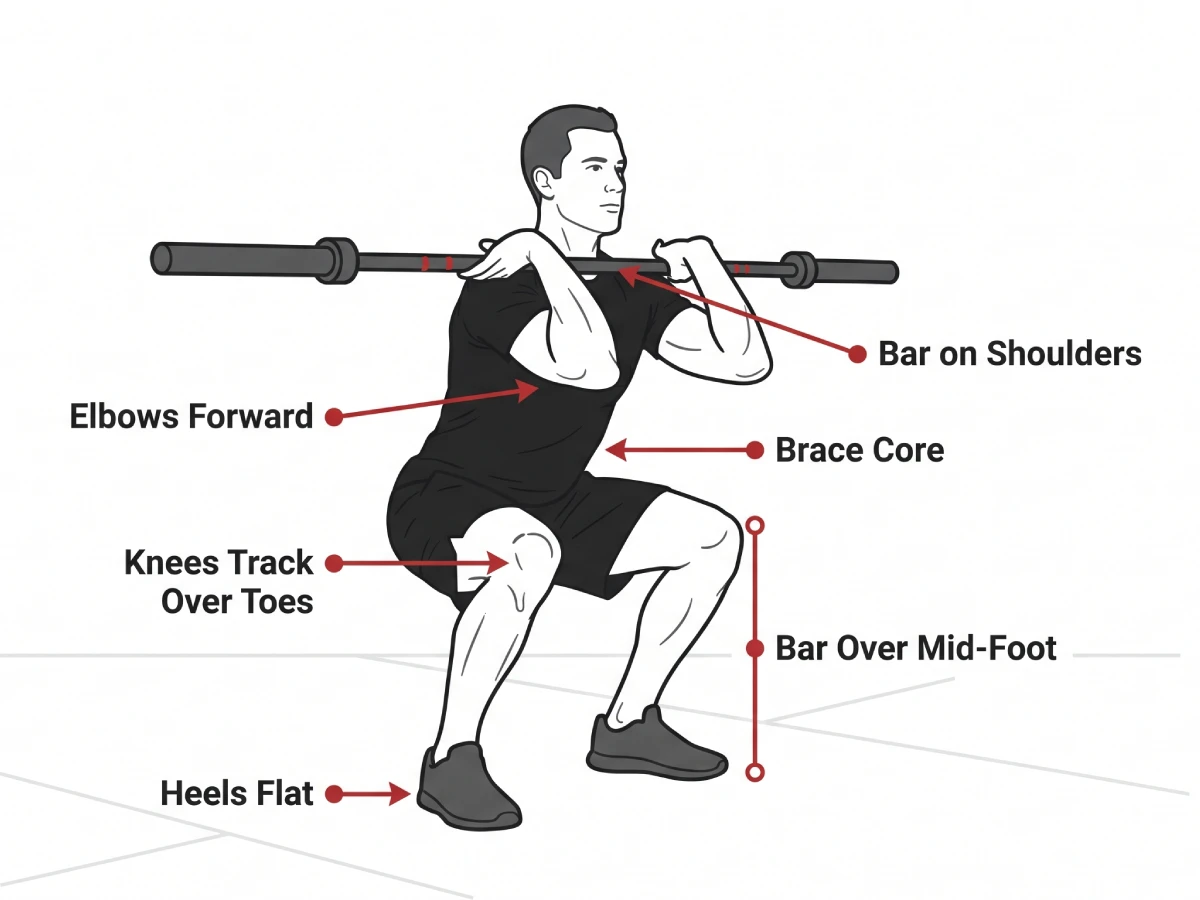
5. Brace before the descent
Take another controlled breath into your trunk.
Tighten your abdominal wall while keeping your ribs stacked over your pelvis. Avoid overextending your lower back in an attempt to make your chest look taller.
Keep your elbows directed forward and maintain light upward pressure into the bar.
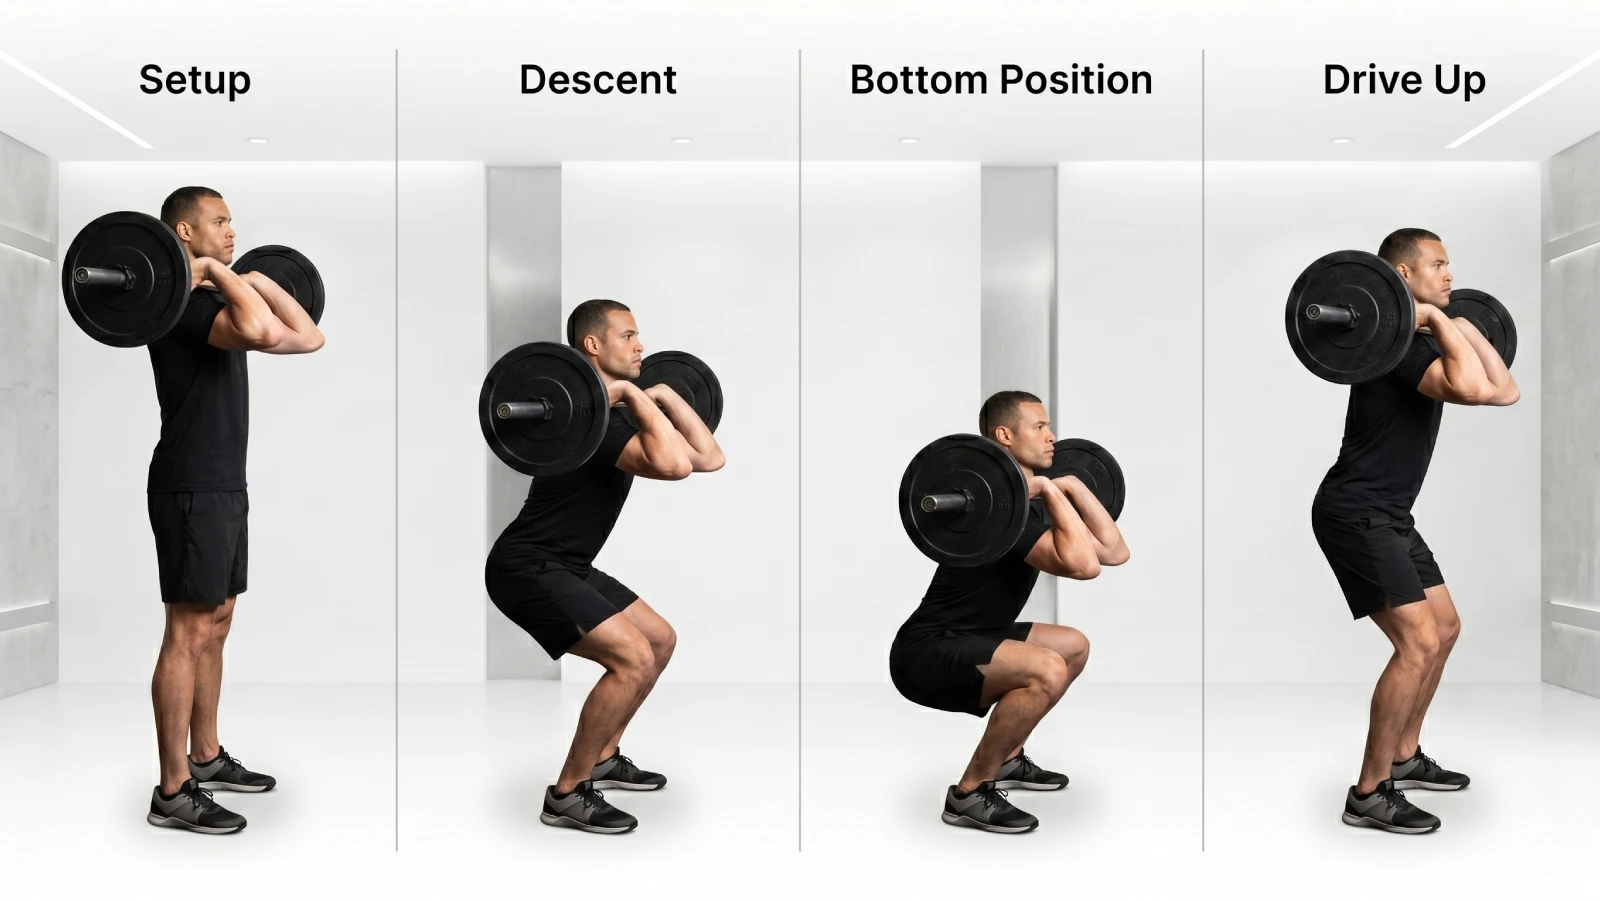
6. Lower under control
Bend your knees and hips together.
Allow your knees to travel forward and outward in the same direction as your toes. Keep pressure distributed across the entire foot rather than shifting onto your toes or heels.
Maintain the bar over the middle of your feet. A small degree of forward torso inclination is normal, but the bar should not roll away from your shoulders.
7. Reach a controlled bottom position
Descend as far as you can while maintaining:
A secure front rack
Stable knee alignment
Balanced foot pressure
A braced torso
Control of the bar
Many lifters aim to bring the hip crease to approximately knee level or slightly below. However, appropriate squat depth varies with anatomy, mobility, training goals and injury history.
A 2024 biomechanical review by Straub et al. emphasized that squat mechanics are influenced by several individual factors, including stance, joint mobility, trunk position and external loading. This supports using the deepest range you can control rather than forcing every lifter into an identical position.
Depth should not come from lifting your heels, collapsing your torso or losing control of your pelvis.
8. Drive out of the bottom
Push the floor away through your entire foot.
Extend your knees and hips together while continuing to drive your elbows forward. Your hips and shoulders should rise at approximately the same rate.
Avoid deliberately throwing your head backwards. Keep your gaze steady and allow the neck to remain in a comfortable, neutral position.
9. Finish and reset
Stand tall without excessively leaning backwards at the top.
Exhale after passing the most difficult part of the repetition. Reset your stance, breath and brace before beginning the next rep.
At the end of the set, walk forward until the bar contacts both rack uprights. Bend your knees slightly to return it to the hooks.
Front Squat Form Checklist
Use this checklist before increasing the weight:
Bar rests across the front deltoids
Hands guide rather than support the full load
Elbows remain directed forward
Ribs stay stacked over the pelvis
Knees track in line with the toes
Heels remain in contact with the floor
Pressure stays across the tripod foot
Bar remains over the mid-foot
Hips and shoulders rise together
Each repetition begins with a fresh brace
Safety arms are correctly positioned
Load remains light enough to control
A simple coaching sequence is:
Elbows forward. Brace. Sit between your feet. Push the floor away.
Front Squat Muscles Worked
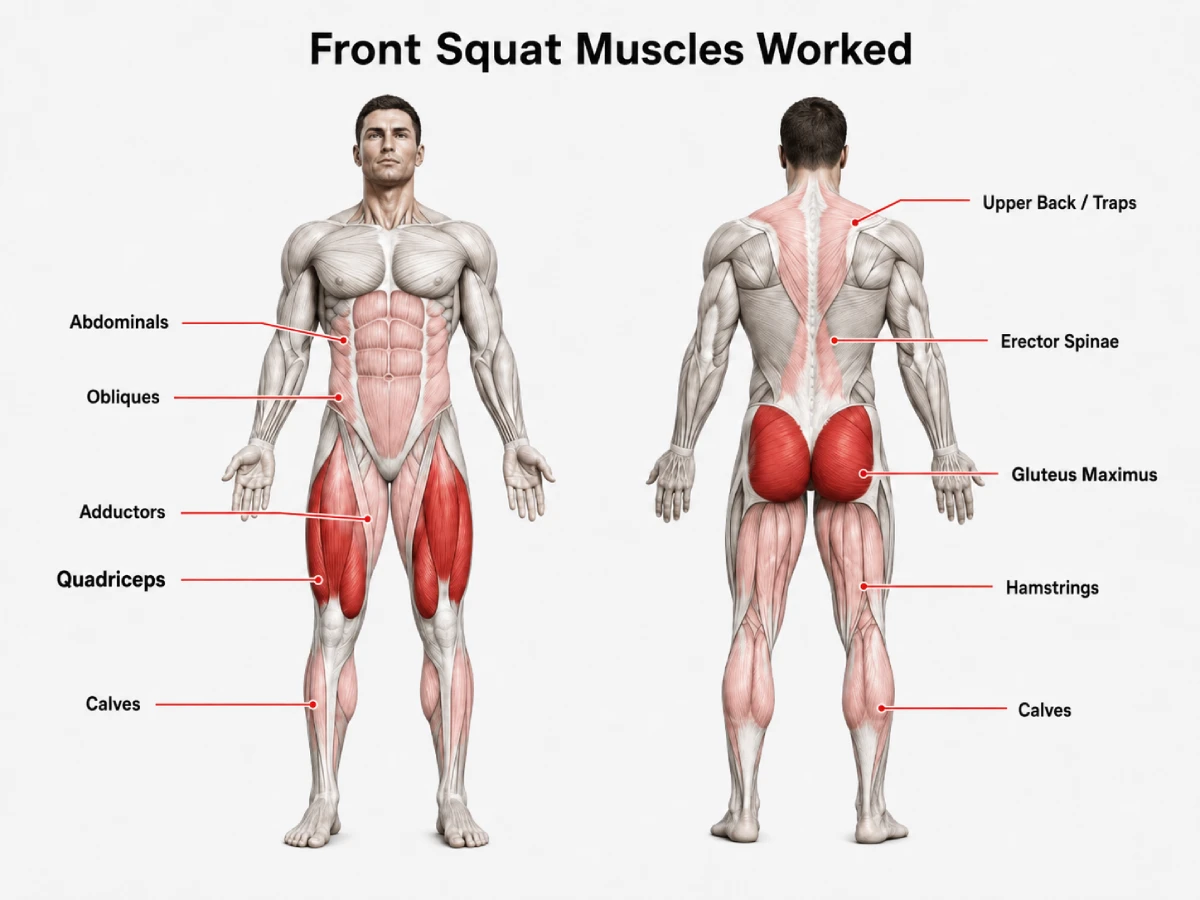
The front squat trains several muscle groups at the same time. The contribution of each muscle changes with your stance, depth, anatomy, tempo and the amount of weight being lifted.
Muscle group | Role during the front squat |
|---|---|
Quadriceps | Extend the knees as you rise |
Gluteus maximus | Extends the hips and contributes to the ascent |
Adductors | Assist hip extension and stabilize the thighs |
Abdominals and obliques | Resist unwanted trunk movement and maintain the brace |
Spinal erectors | Help preserve torso position |
Upper back and trapezius | Support the front rack and resist forward collapse |
Hamstrings | Assist joint control and coordinate movement at the knees and hips |
Calves | Help stabilize the ankles and maintain balance |
Quadriceps
The quadriceps are the primary knee extensors during the front squat.
As you descend, the knees bend under load. During the upward phase, the quadriceps produce force to extend the knees and return you to standing.
The forward bar position and relatively upright torso commonly make the movement feel more quadriceps-dominant than some back squat styles.
However, feeling an exercise in one muscle does not prove that it will always produce greater muscle growth there. Training volume, range of motion, effort, recovery and progressive overload remain important.
Gluteus maximus and adductors
The gluteus maximus helps extend the hips as you stand from the bottom position.
The adductor magnus also contributes to hip extension, especially through deeper portions of the squat. The front squat should therefore not be considered a quadriceps-only movement.
Core and spinal erectors
The abdominal muscles, obliques and spinal erectors work together to prevent the torso from collapsing or rotating.
Because the bar sits in front of the body, the trunk must resist a strong forward-pulling demand.
Upper back and trapezius
The upper back supports the front-rack position and helps keep the elbows from dropping.
Weakness or fatigue in this area may cause the chest to fall and the bar to roll forward even when the legs are strong enough to complete the repetition.
A 2020 investigation by Bautista et al. compared muscle activation during the front squat, overhead squat, back extension and plank. The researchers recorded meaningful activation across the leg, trunk and scapular musculature during the front squat, supporting its use as more than a leg-only exercise.
Muscle activation data should still be interpreted carefully. Higher activation during a single repetition does not automatically predict greater long-term strength or hypertrophy.
Evidence-Based Benefits of Front Squats
Builds quadriceps strength
The front squat creates substantial knee-extension demand and can be used to develop quadriceps strength.
It can also complement more stable lower-body movements such as the leg press and machine hack squat.
The front squat trains balance, bracing and free-weight control. Machines reduce those stability requirements and may allow the leg muscles to be trained closer to fatigue without the front rack becoming the limiting factor.
Develops core and upper-back strength
The front-loaded bar position challenges your ability to maintain trunk stiffness.
Your core must resist excessive spinal flexion or extension, while your upper back must keep the elbows and shoulders in a position that prevents the bar from rolling forward.
This makes the front squat useful when the goal includes postural strength rather than lower-body loading alone.
Encourages an upright squat pattern
Most lifters perform the front squat with a more upright torso than a low-bar back squat.
That does not mean the torso must remain perfectly vertical. Some forward inclination is natural and necessary to keep the combined center of mass over the feet.
The aim is to maintain a consistent torso angle and vertical bar path rather than forcing an artificial posture.
Strengthens the clean-receiving position
The front squat closely resembles the position used to receive a bar during the clean.
Olympic weightlifters use it to improve their ability to maintain the front rack and stand from a heavy clean. Recreational lifters can also benefit from the coordination and upper-back strength required to control the position.
Provides a strong stimulus with less external load
A biomechanical analysis by Gullett et al. (2009) compared front and back squats in trained participants.
The researchers reported similar overall muscle activity between the two variations under the study conditions. The front squat also produced lower compressive forces at the knee and lower extensor moments than the back squat, despite using a lighter external load.
This does not establish the front squat as universally safer. Joint stress depends on technique, loading, range of motion, anatomy, training history and individual tolerance.
The more practical conclusion is that the front squat can provide a meaningful lower-body training stimulus without requiring the same absolute weight typically used in a back squat.
Makes technical breakdown easy to identify
Poor front squat technique produces clear feedback.
Common signs include:
Elbows dropping
The bar rolling forward
Torso collapsing
Heels lifting
Knees moving inward
Hips rising before the shoulders
Because the front rack is difficult to maintain after the torso loses position, technical failure is often easier to identify than it is during some other squat variations.
Front Squat vs Back Squat
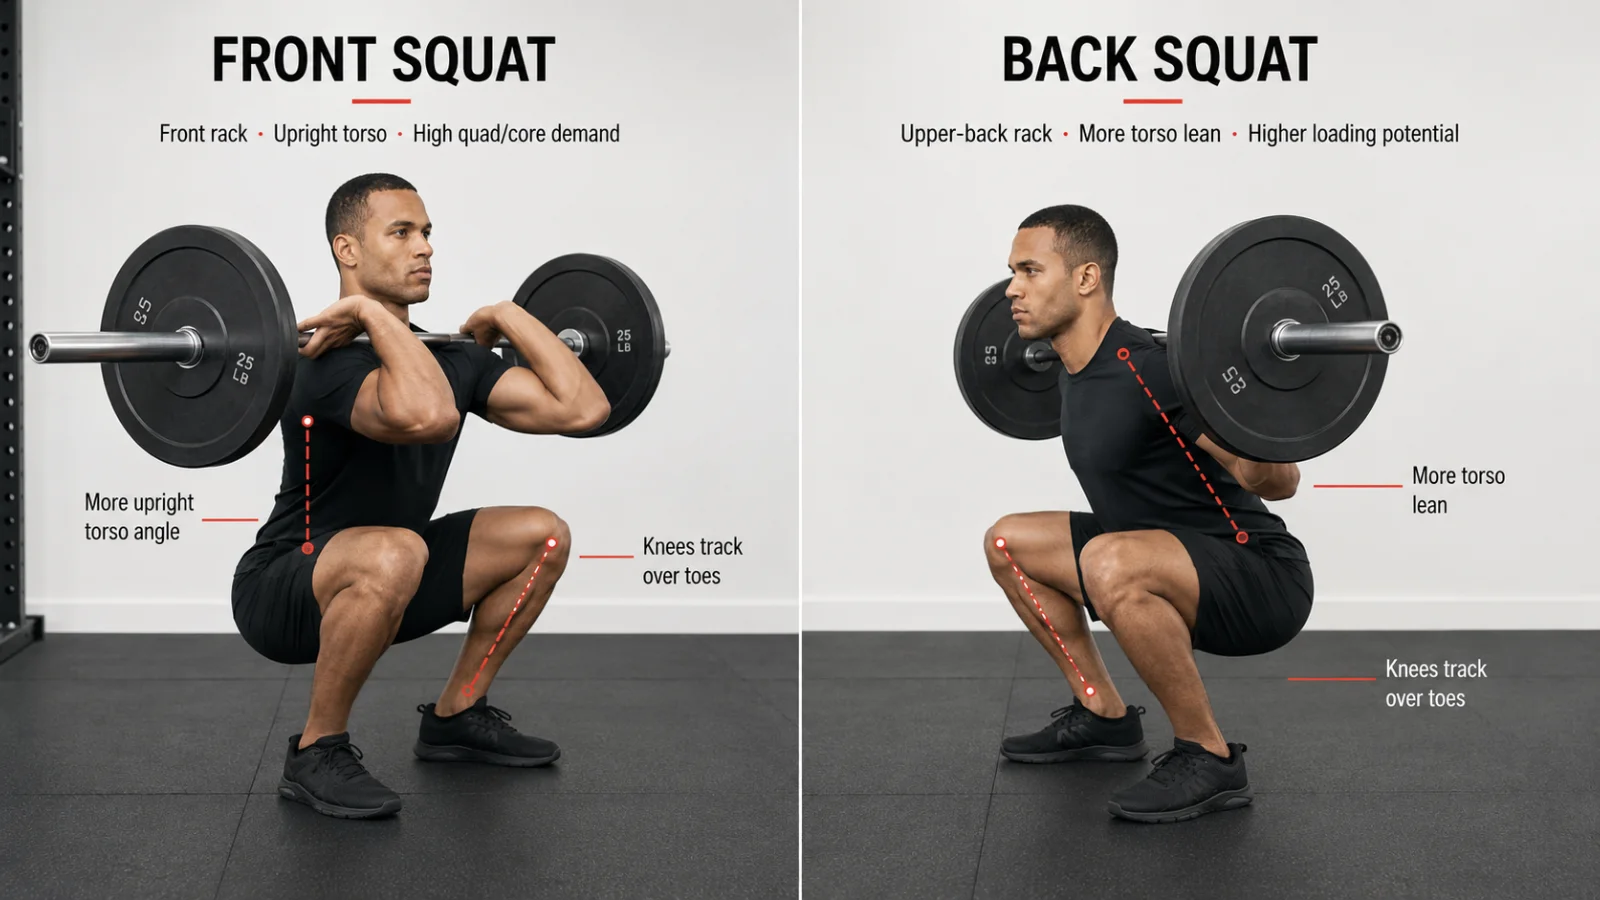
Neither exercise is inherently better. They share several benefits, but their bar positions create different loading, mobility and technical demands.
Factor | Front squat | Back squat |
|---|---|---|
Bar position | Across the front shoulders | Across the upper back |
Typical torso position | More upright | Usually more inclined |
Typical loading potential | Lower | Higher |
Quadriceps demand | High | High, depending on technique |
Hip contribution | Moderate to high | Often higher in low-bar variations |
Core and upper-back demand | High | High, but distributed differently |
Wrist mobility requirement | Higher | Lower |
Front-rack mobility | Required | Not required |
Olympic lifting transfer | Direct | Indirect |
Common limiting factor | Front rack and upper-back strength | Hip strength, trunk control or bar path |
Which squat works the quadriceps more?
Both front and back squats can build the quadriceps when performed through a suitable range of motion with progressive resistance.
A 2015 analysis by Yavuz et al. compared joint movement and muscle activity during maximum-load front and back squats. The results illustrate that muscular demands change with bar position, joint mechanics and the load that can be used.
Rather than declaring one variation universally superior, exercise selection should account for the athlete’s technique, goals and ability to train the movement consistently.
Which squat is easier on the lower back?
The front squat commonly uses less external weight and a more upright torso. Some lifters therefore find it more comfortable for the lower back.
However, this does not make it a rehabilitation exercise or guarantee that it will be pain-free. A failed brace, poor rack position or excessive loading can still create unwanted spinal stress.
Anyone experiencing persistent back pain should seek individual assessment rather than relying on a general exercise comparison.
Which squat lets you lift more weight?
Most trained lifters can back squat more than they can front squat.
The back-rack position generally allows greater loading and may make it easier to involve the hips and posterior chain. The front squat is more likely to be limited by upper-back strength, trunk position or the rack itself.
More weight does not automatically mean a more effective exercise. The better variation is the one that provides the intended stimulus while allowing repeatable, controlled technique.
Should you use both?
Many well-designed programmes include both.
You may use the back squat as your primary heavy squat and the front squat as a secondary movement for quadriceps, trunk strength or Olympic lifting support.
You can also make the front squat your main variation if it better suits your sport, goals or tolerance.
Read the LIFE FIT barbell back squat guide for a complete breakdown of the back-rack variation.
Common Front Squat Mistakes and How to Fix Them

Mistake | Likely cause | Practical fix |
|---|---|---|
Elbows drop | Weak upper back, poor mobility or excessive weight | Reduce the load and use controlled-tempo repetitions |
Bar rests in the hands | Insecure shoulder shelf or misunderstood rack position | Let the deltoids support the bar |
Torso collapses | Brace fails or bar moves away from mid-foot | Improve bracing and practise paused squats |
Heels lift | Limited ankle mobility or unsuitable stance | Adjust stance, improve mobility or use lifting shoes |
Knees collapse inward | Poor control or excessive fatigue | Reduce the load and reinforce knee tracking |
Hips rise first | Quadriceps or upper-back position fails | Keep the elbows up and make the chest and hips rise together |
Depth is forced | Mobility or control is insufficient | Use the deepest stable range and progress gradually |
Elbows dropping
Problem: Your elbows fall towards the floor during the descent or ascent.
Likely cause: The load may be too heavy, the upper back may be fatigued or your lats, triceps and shoulders may restrict the front-rack position.
Why it matters: Once the elbows drop, the shoulder shelf becomes less stable. The bar begins to roll forward and pulls the torso down with it.
The fix: Drive your elbows towards the wall in front of you. Reduce the load and use a three-second lowering phase to develop postural endurance.
Front-rack holds can also help. Un-rack a manageable weight and hold the correct position for 10–20 seconds without squatting.
Holding the bar in your hands
Problem: Your wrists and fingers carry most of the bar’s weight.
Likely cause: You have not placed the bar securely on your deltoids, or you are trying to maintain a full closed-hand grip despite limited mobility.
Why it matters: Supporting the bar with the hands increases wrist discomfort and makes the front rack unstable.
The fix: Lift your elbows and allow the bar to settle onto the shoulders. Use two or three fingertips if necessary.
Remember: your hands guide the bar; your shoulders support it.
Torso collapsing forward
Problem: Your chest drops and the bar moves forward during the repetition.
Likely cause: Your brace may be insufficient, the load may be too heavy or the upper back may be unable to maintain the rack position.
Why it matters: As the bar travels away from the mid-foot, balance becomes harder to maintain. The lift may turn into a forward recovery rather than a controlled squat.
The fix: Reduce the load. Practice paused front squats, tempo front squats and front-rack holds.
Before every repetition, take a full breath and create pressure around the entire trunk rather than only pushing the abdomen forward.
Heels lifting
Problem: Your heels rise as you approach the bottom of the squat.
Likely cause: Limited ankle dorsiflexion, an unsuitable stance, unstable footwear or an attempt to keep the torso artificially vertical.
Why it matters: Heel lift moves your center of pressure forward and makes the bar harder to balance.
The fix: Experiment with a slightly wider stance or more toe angle. Improve ankle mobility and wear shoes with a firm, stable sole.
Weightlifting shoes with an elevated heel may help you achieve a deeper position, but they should not be used to hide a complete loss of foot control.
Knees collapsing inward
Problem: One or both knees move noticeably inside the line of the toes.
Likely cause: The load may be too heavy, fatigue may be reducing control or your stance may not suit your hip structure.
Why it matters: Sudden inward movement may reduce stability and make it harder to produce force evenly.
The fix: Reduce the weight and practice slower descents. Keep the knees moving in the same general direction as the toes.
Use the cue “spread the floor” without rolling onto the outside edges of your feet.
Hips rising before the chest
Problem: Your hips shoot upward while your shoulders remain low.
Likely cause: The quadriceps or upper-back position may be failing, or you may be relying on a hip-dominant strategy to escape the bottom.
Why it matters: The movement begins to resemble a good morning. This shifts mechanical demand away from the quadriceps and forces the lower back, glutes and hamstrings to hinge the weight up prematurely.
It also moves the bar forward relative to the mid-foot, increasing the risk of losing the rack.
The fix: Reduce the load and drive your elbows upward as you initiate the ascent. Think about making the hips and chest rise together.
Paused front squats can strengthen the bottom position, while heel-elevated or high-bar squat variations may help build the required knee-extension strength.
Forcing excessive depth
Problem: You descend lower than you can control and lose your brace, foot pressure or pelvic position.
Likely cause: You may be trying to reach an arbitrary depth rather than working within your available mobility.
Why it matters: Additional depth is not useful when it causes the bar to roll, the heels to lift or the torso to collapse.
The fix: Squat only as deep as you can while maintaining a secure rack and balanced position. Gradually increase the range through mobility work, controlled pauses and lighter repetitions.

Front Squat Mobility Fixes for Wrists and Ankles
Mobility work should address the structure or position that is actually limiting your squat.
The front rack depends on several areas working together:
Wrist extension
Elbow flexion
Shoulder external rotation
Lat and triceps flexibility
Thoracic extension
Scapular control
Limited ankle dorsiflexion can also make it difficult to reach depth while keeping the heel down.
Front-rack stretch in the squat rack
Place an empty bar in the rack at shoulder height.
Step underneath it and establish a light front-rack position while the bar remains supported by the hooks. Gently drive one elbow upward at a time.
Hold for 20–30 seconds without forcing the wrists into pain.
Lat and triceps mobilization
Place one elbow on a bench or rack support with the hand behind your head.
Move your chest gently downward while keeping your ribs controlled. You should feel a stretch through the latissimus dorsi or triceps rather than pressure in the lower back.
Perform two or three controlled holds on each side.
Wrist preparation
Use gentle wrist circles followed by controlled palm-down and palm-up stretches.
Do not aggressively force the wrist backwards. The goal is to improve tolerance gradually, not to create more irritation before training.
If wrist discomfort remains, use a cross-arm or strap-assisted grip while continuing to develop the clean position separately.
Thoracic extension drill
Place your upper back across a foam roller while supporting your head with your hands.
Gently extend over the roller without flaring your ribs excessively. Move the roller slightly higher or lower to address different areas of the upper back.
Thoracic control can help you maintain the shoulder shelf without compensating through the lower back.
Knee-to-wall ankle drill
Stand facing a wall with one foot several centimeters away.
Drive the knee towards the wall while keeping the heel down and the knee aligned with the toes. Move the foot farther away as your range improves.
Perform controlled repetitions rather than bouncing into the end position.
Goblet squat hold
Hold a light dumbbell close to your chest and sit into a comfortable squat.
Maintain full foot contact and use your elbows to apply gentle outward pressure against the inner knees.
The dumbbell goblet squat is also an effective regression for learning squat depth, bracing and knee tracking without the mobility demands of a barbell front rack.
Front Squat Variations and Alternatives
Choose a variation according to the specific limitation or training goal you want to address.
Goblet squat
Best for: Beginners and technique development
Hold a dumbbell or kettlebell close to your chest.
The goblet squat teaches a front-loaded squat pattern without requiring a barbell rack position. It is useful for learning depth, balance and knee tracking.
Cross-arm front squat
Best for: Lifters with limited wrist mobility
Support the bar on the shoulders and cross your arms over it.
This reduces wrist-extension demands but may feel less secure than a clean grip.
Strap-assisted front squat
Best for: Developing the clean grip gradually
Attach lifting straps to the bar and hold their ends while keeping the elbows high.
The straps allow you to maintain a front-rack position without forcing the wrists into an uncomfortable range.
Zombie front squat
Best for: Torso control and bar placement
Extend both arms straight in front of you while the bar rests on the shoulders.
Because your hands do not secure the bar, the exercise gives immediate feedback when the elbows drop or the torso leans too far forward.
Use light weights and correctly positioned safety arms.
Pause front squat
Best for: Bottom-position strength
Pause for one to three seconds at the bottom before standing.
Maintain your brace and foot pressure throughout the pause. Do not relax or allow the bar to settle further into the shoulders.
Tempo front squat
Best for: Technique and hypertrophy
Take three to five seconds to lower into the squat before standing at a normal controlled speed.
The slower descent makes balance and positional errors easier to identify. It also increases time under tension without requiring maximal loads.
Heel-elevated front squat
Best for: Lifters with restricted ankle dorsiflexion
Use weightlifting shoes or a stable squat wedge.
The elevated heel allows the knees to travel farther forward and can help some lifters reach depth with a more stable torso.
Machine hack squat
Best for: Quadriceps training without a front-rack limitation
The hack squat provides external stability and removes the wrist, shoulder and upper-back demands of the front squat.
It is a useful alternative when the legs need more training volume but the front rack has already become fatigued.
Leg press
Best for: Stable lower-body loading
The leg press allows you to train the legs without balancing a barbell.
It can be used after front squats or as a temporary alternative when mobility, fatigue or equipment access makes free-weight squatting impractical.
How to Program Front Squats by Training Goal
Programming should reflect your experience, technique and the position of the front squat within the rest of your lower-body training.
Percentages are approximate. Your front squat one-repetition maximum may change as your rack position and technique improve.
Goal | Sets | Repetitions | Approximate intensity | Effort target |
|---|---|---|---|---|
Technique | 3–5 | 3–5 | 50–65% 1RM | RPE 5–6 |
Strength | 3–6 | 2–5 | 75–90% 1RM | RPE 7–9 |
Muscle growth | 3–5 | 6–10 | 65–80% 1RM | RPE 7–9 |
Olympic lifting support | 3–5 | 2–4 | 70–85% 1RM | RPE 6–8 |
General fitness | 2–4 | 5–8 | Moderate load | RPE 6–8 |
Tempo or pause work | 3–4 | 3–6 | 55–75% 1RM | RPE 6–8 |
RPE 7 means you could complete approximately three more repetitions with good form.
RPE 8 means you have around two clean repetitions remaining.
RPE 9 means you could probably complete one more repetition, but technique may be close to breaking down.
Front squats for beginners
Perform three sets of five repetitions once or twice per week.
Begin with a goblet squat or empty bar. Work around RPE 5–6, meaning every repetition should feel controlled and several clean reps should remain available.
Add a small amount of weight only when you can consistently:
Maintain the front rack
Keep your heels down
Reach a repeatable depth
Prevent the bar from rolling
Rerack the weight safely
Front squats for strength
Use three to six sets of two to five repetitions.
Most working sets will fall around 75–90% of front squat 1RM, depending on the phase of training. An RPE of 7–9 is appropriate for experienced lifters.
Avoid turning every session into a maximal test. The front squat is technically demanding, and repeated grinding can reinforce poor torso or elbow position.
Rest for approximately two to five minutes between challenging sets.
Front squats for muscle growth
Use three to five sets of six to ten repetitions.
Choose a load around 65–80% of your front squat 1RM, or approximately RPE 7–8 for most sets. Finish with one to three clean repetitions in reserve rather than training to absolute technical failure.
In the front squat, the upper back or rack position may fail before the quadriceps are fully fatigued. Combine the exercise with more stable movements such as leg presses, hack squats or leg extensions when greater quadriceps volume is required.
Front squats for Olympic lifting
Use three to five sets of two to four repetitions.
Work around 70–85% of front squat 1RM for most sessions, depending on the athlete’s competition phase and clean volume.
Prioritise:
A competition-relevant clean grip
Fast but controlled ascents
Stable recovery from the bottom
Consistent elbow position
Enough reserve to avoid slow technical breakdown
Heavy singles can be useful for advanced weightlifters, but they should be programmed deliberately rather than performed randomly.
Front squats for athletic performance
Use three to five sets of three to six repetitions around RPE 6–8.
Front squats can contribute to lower-body strength, but they should be combined with training that reflects the athlete’s sport, such as sprinting, jumping, change-of-direction practice or Olympic lift variations.
A six-week study by Contreras et al. (2017) compared front squat and hip thrust training in adolescent males and found that the exercises produced different performance adaptations.
The practical takeaway is not that one exercise is always better. It is that exercise selection should match the physical quality the programme is intended to develop.
Weekly frequency
One or two front squat sessions per week are sufficient for many recreational lifters.
More frequent training may be appropriate for Olympic weightlifters or lifters specialising in the movement, provided total volume and fatigue are managed.
A simple two-day structure could look like this:
Session | Focus | Example |
|---|---|---|
Day 1 | Strength | 4 sets of 4 at RPE 7–8 |
Day 2 | Technique or volume | 3 sets of 6 at RPE 6–7 |
Avoid increasing load, sets, repetitions and frequency at the same time. Progress one variable while monitoring technique and recovery.
Who Should Include Front Squats?
Front squats may be particularly useful for:
Olympic weightlifters
Athletes developing lower-body strength
Lifters seeking a front-loaded squat variation
People prioritising quadriceps and trunk strength
Lifters who tolerate front loading better than back loading
Anyone improving the clean-receiving position
You may need to modify or avoid the exercise if you have:
Acute wrist, elbow or shoulder pain
Knee or back pain that worsens during the movement
An injury that makes loaded squatting unsuitable
Insufficient control to maintain the bar securely
No appropriate rack or safety equipment
Medical restrictions affecting resistance training
Training discomfort and injury pain are not the same. Stop if you experience sharp, sudden or worsening pain and seek guidance from a qualified healthcare professional.
Front Squat Safety Tips
Use a stable rack with correctly positioned safety arms.
Practise releasing the bar safely before lifting heavy.
Begin with an empty bar when learning a new grip.
Keep the training area clear.
Check the bar, plates and rack before use.
Avoid unstable running shoes with soft, compressible soles.
Use collars when appropriate for your lifting environment.
Do not attempt maximal loads without sufficient experience.
Increase weight only while your technique remains repeatable.
Ask a qualified coach to review your form where possible.
For a dedicated training area, read the LIFE FIT home gym setup guide and squat rack buying guide before selecting equipment and flooring.
Frequently Asked Questions
Are front squats better than back squats?
Front squats are not universally better.
They usually involve a more upright torso, require a front-rack position and have direct carryover to the clean. Back squats typically allow greater loading and offer more flexibility in bar placement and technique.
Choose the movement that best fits your goals, mobility and training history.
What muscles do front squats work most?
The quadriceps and gluteus maximus are the main lower-body muscles involved.
The adductors, hamstrings, calves, abdominals, obliques, spinal erectors, trapezius and upper-back muscles also contribute to movement or stability.
Why do front squats hurt my wrists?
Wrist discomfort often occurs when the hands are supporting the bar rather than guiding it.
Restrictions in the lats, triceps, shoulders or upper back can also make the clean grip harder to maintain.
Use a lighter load, place the bar securely on the deltoids and try keeping only two or three fingertips underneath it. A cross-arm or strap-assisted grip may be more comfortable while mobility improves.
Sharp or persistent wrist pain should not be ignored.
Should my heels stay on the floor?
Yes. Your heels should normally remain in contact with the floor throughout the repetition.
If they lift, check your ankle mobility, stance, footwear and load. Weightlifting shoes may help, but you should still maintain balanced pressure across the entire foot.
How deep should I front squat?
Use the deepest range you can control without losing your brace, lifting your heels or allowing the bar to roll forward.
Your anatomy, mobility, training goal and injury history should determine the appropriate depth.
How often should I front squat?
One or two sessions per week work well for many recreational lifters.
Olympic weightlifters and front-squat-focused programmes may use the exercise more frequently. Total weekly volume, intensity and recovery should guide the final schedule.
Can beginners perform front squats?
Yes, but many beginners benefit from learning the bodyweight or goblet squat first.
The barbell front squat requires more coordination and mobility than a basic squat. Begin with a light load and prioritise the rack position, balance and safe use of the squat rack.
Can front squats replace back squats?
They can serve as your primary squat if they suit your goals and can be performed comfortably.
However, you do not need to choose only one. Many programmes use the two variations for different purposes.
Why do I feel front squats in my upper back?
Your upper back must work isometrically to support the bar and prevent your torso from collapsing.
Some muscular fatigue in the upper back is normal. Sharp pain, numbness or pain directly on the spine is not and should be assessed.
Are front squats good for building muscle?
Yes. Front squats can build muscle when performed with sufficient range of motion, effort, volume and progressive overload.
However, the front rack may become the limiting factor during higher-repetition sets. More stable leg exercises can be added when extra quadriceps or glute training volume is needed.
Final Takeaway
The front squat is a demanding compound exercise that develops lower-body strength while challenging your core, upper back and front-rack control.
The most important technical priorities are:
Let your shoulders support the bar
Use your hands only to guide it
Keep your elbows directed forward
Brace before every repetition
Maintain pressure across the whole foot
Keep the bar balanced over the mid-foot
Make the hips and shoulders rise together
Increase the load only when the position remains stable
Start lighter than you think you need to.
A controlled front squat with a stable rack, balanced foot pressure and repeatable depth will produce more useful training than a heavier repetition that forces you to fight the bar throughout the movement.